"And the Lord God took the man, and put him into the garden of Eden to dress and keep it". Genesis 2:15

Tuesday, September 29, 2009

Photos late September

Here are a few photos from late September. I have been refurbishing the front flower beds. These beds right in front of the porch get hardly any sun and hardly anything grows there. If you look at this photo taken last year (its not time for the Red Oak to turn red yet here, but it will be great when it does) you can see that only a few clumps of Cast Iron Plant are growing in the bed right in front of the porch railing.


I would like to put some low growing evergreen bushes in front of the porch, but for now I am only going to refurbish this bed with existing plants. I dug up a few scraggily things that needed more sun and moved them elsewhere, then I dug up the clumps of Cast Iron Plant and spread them out in the middle of the bed. From another location I dug up about a foot sized clump of Liriopie. This was enough to spread all along the edge of the bed. Now both the Cast iron Plant and the Liriopie will thicken and spread. They are both evergreen so, until I can get some bushes in the back, my bed will look still full from the street even in the winter.


I bought a one gallon pot of Cast iron Plant 6 years ago. I took that clump from the old house and broke it up into 5 clumps for the front of this house. Now four years later I have spread three of those clumps out on this side of the porch (I still have to do the other side). This is one way to make gardening economical, by taking advantage of plants that can be divided. My two other favorite dividing plants are Irises and Day Lilies. I also take advantage of bulbs that divide such as daffodils, Joseph's and Ox Blood Lilies, grape Hyacinths, and spring and autumn crocus, as well as saving seed every year from many of my flowers.


Giant Pink Autumn Crocus


Golden Rod gift from the birds.


Yellow Autumn Crocus in front of the Pyracantha.


I have forgotten the name of this already. It is a spreading ground cover for under the pink Knockout roses.


Lantana


My first cup of tea from the herbal tea garden. I realize now that if you are going to be cutting a lot on something you need to plant a lot more than you would think. In this picture the blue flowers are Borage flowers with a borage leaf on bottom of the pile, the white and yellow ones are Camomile, and the ferny sprig is fennel. It was a good cup of tea!


Four-O'clocks. Pyracantha on left.


Four O'clocks.


Morning Glory.


Wednesday, September 23, 2009

My Black Soldier Fly Larvae Set Up

This is my Black Soldier Fly (BSF) bin set up. A 55 gallon water barrel with a hatch cut into one side. My father made this for using as a rolling composter. I inherited two of these, and when I found quite a few BSF Larvae in one of them I switched it over to just raising the larvae. The other one is still doing duty as a composter. It gets less food scraps and has less larvae in it.


The bin is about 1/4 full of substrate and larvae. I have quite a big colony now as my family of four eats a lot of vegetables and we always have plenty of scraps. My self-harvesting system is a ramp made of a piece of 2" PVC pipe and a plastic container with a screw on lid. This works ok, but I need to get Garry to cut the pipe in half for more of its length as it tends to get clogged as it is.  As it is the larvae can just climb up the round top of it and exit the bung hole in the side of the barrel, which is a little too big for the pipe.

The pipe goes into a hole cut in the side of the plastic container. This is a tight fit and the larvae fall into the container, which has a tight fitting screw on lid. So far I only have one pipe, but I have plans for two. Again waiting on Garry the power tool man. I have not concentrated a lot on the harvesting part as I have not gotten chickens yet. I fully realize though that harvesting is the whole point of raising the critters and hope to get a more perfect system worked out.

So far I have a lot of larvae and no real use for them, other than the fact that they are reducing my food scrapes and keeping them out of the garbage and landfill ( In addition to the fun I have had in raising them!) I plan on getting chickens and using the BSF as a feed supplement -they are supposed to be high in protein and fat. At the moment I save any BSF I do collect and give them to a friend that has chickens. I have also tried feeding them to our cats. As long as I mix them half-and-half with canned cat food the cats will eat them.


The barrel sits on bricks sunk in pans filled with water. This is to keep out ants. Not shown is a glass bottle with screw on lid attached to a length of garden hose, that collects "compost tea" from a hole drilled in the bottom of the bin.


The other two uses for the BSF larvae (other than chicken and fish feed) is the "compost"  and the "compost tea" they produce. I have not done any experiments with this other than feed my red worms some of the "compost". They seemed to like it all right, but, despite what I have read, if you put any of the BSF compost in with your red worms you will get BSF in your worm bin. This isn't too much of a problem. I keep my worm bin pretty dry and do not over feed, but the bin is in the laundry room so maturing Black Soldier Flies find their way into my house.

Mature flies look like pretty black wasps, except since the adults only function is egg production, and they do not even eat in this stage, they have no mouth parts so they can not bite or sting you at all. Also, unlike house flies, they do not carry disease and are not attracted to your food or garbage. When we find one in the house we just catch it and let it go outside.

I have watered a few plants with diluted compost tea, but have nothing to report on the effectiveness since I have not made an experiment out of it.


A small section of the insides showing the larvae. I admit this looks gross, but there is no smell. Usually I save up the days worth of vegetable scraps and feed them to the BSF in the morning. One morning recently I took the scraps outside to the BSF. The BSF were all hidden under the substrate. After I sprinkled the food scraps on top of the substrate the BSF started making a noise like a million tiny bubbles popping, or like rice crispies! I dont know how they know I have just fed them, whether they feel the vibration or if they can somehow smell the food, but they always react. It didn't take them long to swarm all over the scraps.


A BSF studded apple. Clove oranges anyone?

This picture could look gross to you, or you could find it fascinating to watch the critters at work (me.) In the stage above when all is wet and dirty, yes its a little gross, but when the larvae mature they turn black, and climb out of the bin, somehow dry and clean. Even my twelve year old daughter will handle the mature larvae and flies, which says a lot if you know her.


Stink Bugs - You Dont Need Poison.


These strange creatures are stink bug nymphs. Stink bugs undergo incomplete metamorphosis. This means that at first they do not look like adults at all, then they grow more and more like the adult form with each molt. I took this picture of the stink bugs on a pomegranate on our tree. There were a lot of them on each pomegranate.


Here is a close up of the nymphs. At first they were bright red. Now they are turning brown and you can see their wing cases (brown blobs on their backs) starting to develop. When their wing cases fully develop, and they have wings, they will be adult stink bugs capable of flying around and wreaking havoc. I wasn't too happy when I found the stink bugs sucking my pomegranates dry. I have had to deal with so many bugs this year! I didn't want to use poison either.

I decided to knock them off with a strong jet of water from the hose. This will work with a lot of bugs (probably the not so smart ones) and they will not be able to find their way back to where they were. I was afraid that stink bugs would be smart and hop right back on the pomegranates, but no, it worked with two tries. After the first spray about a quarter of them came back. I made the second spray longer and stronger and only a few came back.

Now I am supposed to hand pick the survivors and throw them in a basin of soapy water. I think I will ask for a volunteer for that job! Hey Anna!

P.S. Does anybody know how to juice pomegranates?

Tuesday, September 22, 2009

Pumpkins! Busy Time

Hurrah! We finally have some pumpkins! After taking over an entire half of the garden for the whole summer the pumpkins have finally started producing. It seems like one day there were no pumpkins, then over night we had four between the size of soccer and basket balls! They are a deep dark green right now. I predict pumpkin pies and muffins in our future!


We worked very hard over the weekend. Now is the time to plant seeds of beets, carrots, lettuces, mustards, radishes, rutabaga, spinach, kale, leeks, and peas. A few fast growing herbs can also be planted such as parsley, dill, cilantro and basil. Wildflower seeds and certain perennials - foxglove, lupines, daisies, poppies, delphinium, coreopsis, dianthus, grasses, eupatorium and veronica - can all be planted now. Planting chart.

We have very little room, so we can't plant everything we would like. On Saturday we did plant carrots, a French lettuce mixture, and some mustard. We sunk a few more sub-irrigators into the ground beforehand for watering. After all that, Anna and I sprayed the soil in various hot spots with predatory nematodes to kill the larvae of various pests such as spider mites, flea beetles, and cucumber beetles. The nematodes were mixed in water and sprayed with a pump sprayer by me, then Anna came along behind me and watered with a watering can to make sure the nematodes went down into the soil. That pretty much wore Anna out, toting can after can of water. (Every night during family devotions we have been praying that God would "bless our nematodes"!)

While this was all going on Claire was working on a project to renovate a path that involved scraping back all the mulch and laying cardboard down on the ground, to block the grass that is growing up in the path, then reapplying mulch. It is a hard job.  Garry has been renovating our back picket-fence. This meant digging and reseting leaning posts, replacing some pickets, and scraping all the paint. Garry was scraping paint all morning while the girls and I worked in the garden.

We also harvested some okra, yellow squash, butternut squash and our first acorn squashes, and a large bowl of lima beans. We had the lima beans that night (they were so tender and delicious), and the steamed acorn squash, and we took a great ratatouille to church on Sunday.

I was pretty ambitious that day and wanted to get started on a project for the front flower bed, the one directly in front of the front porch. This bed gets so much shade that not much will grow there. I wanted to take out what was not doing well, and divide and spread out the stuff that was doing well, which is basically just cast iron plant, then I wanted to transplant some liriope from another bed to edge the front of this bed. Both cast iron plant and liriope are evergreen and would look good all winter. The back of the bed up against the porch railings would be bare until we can afford some low-growing evergreen bushes, but from the street the cast iron plant gives the illusion of a full bed.

Well I got as far as moving a few things that needed more sun to a different bed, and raking back the mulch, then I was pooped and had to stop. On Monday morning I did divide one large cast iron plant clump and spread it out in the middle of the bed. When I was teaching my flute lessons in the afternoon I kept wondering why my back hurt so much!

Saturday, September 12, 2009

Masala Stuffed Okra Boats (No slime!)

Clemson Spineless Okra
Marmalade under the okra.


I like the Okra I grew this year, Clemson Spineless. It doesn't grow as tall as okra I have grown before, but is bushier and consequently has more blooms and pods. I pick the okra every day and store it in the fridge in a tupperware container lined with a paper towel. I only  have four okra plants, since it is not a family favorite, so it takes about three days to get enough for a family meal. I like it myself and have been trying to find ways that my family will eat it - other than breaded and fried.

The main objection to okra most people have, if it is not fried, is that it is slimy. I did some research and got the advice that if you do not want your okra to be slimy you have to carefully dry each piece before you cook it. I guess excess moisture contributes to the slime.  If you cook the whole fresh okra pods in a pan on top of the stove over low heat, with just a little oil, you will have no slime.

Most of the recipes I found on the internet for okra, that were not your traditional southern deep-fried, were from India! When I look for a recipe on the internet I usually find two or three for the same thing, then combine them into what suits my kitchen and ingredients on hand. I found a bunch of recipes for masala stuffed okra boats and came up with this recipe for me: (Masala is a paste made of a little tomato and a lot of spice. The mixture is first cooked to make the spices all fragrant, then it is used in various dishes.)

You need about 30 okra pods for 4 people. Cut your pods when they are 2 - 4 inches long.

Combine in a large fry pan on top of the stove:
One can of diced tomatoes and sweet onions, drained.
One-inch piece of ginger, peeled and chopped.
One tsp each of ground cumin, ground coriander, and tumeric
1/4 tsp of red pepper flakes

Stir until thick, hot and fragrant.
Add one Tbls of lemon juice.
(The lemon juice is taking the place of one tsp of amchur powder (dried green mangos) because we did not have any! The amchur powder is for tanginess, so the lemon juice is O.K. Also missing is garam masala. Is this even masala without garam masala? I dont know, but it sure tasted good! When I get these ingredients, I will try this properly, but for now you can make it too with common ingredients.)

Take the pan off the heat and let the masala mixture cool a little. While this is cooling cut off the stems of each okra pod, and make a slit from the stem end up to the tip. Don't cut through the tip or the pod will split in half. Hold a pod in you left hand with your thumb holding open the slit you made in the pod. With you right hand use a butter knife to scoop up a tsp of the masala and fill your pod slits from wide (thumb) end to tip.

Beware! If you dont want yellow fingernails, wear some thin latex gloves! (Believe me.)

Save any left over spice mixture to season your main-dish meat. Put a little ( one Tbls. ) oil in the bottom of your same fry pan so as not to waste any of that spice. Turn the pan on medium low heat and add your okra. Cook covered, stirring carefully occasionally, for 15 - 20 minutes. Dont let the oil get sizzling hot. You dont want to brown the okra, just cook it until it is tender, but not mushy. No slime! This dish is sweet, tangy, flavorful and just a little spicy. Delicious! (And my family ate it, even though they are prejudiced against okra.)

Masala stuffed Okra Boats just starting to cook.

Saturday, September 5, 2009

Squash blossoms For Dinner


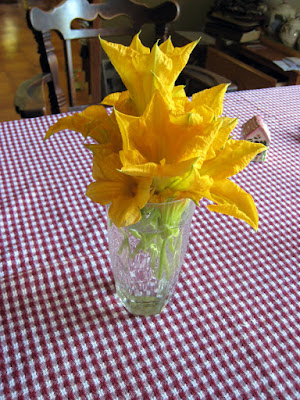
A few days ago we tried something new - squash blossoms for dinner! It has been a dream of mine to create an edible landscape. One in which most of the plants are not only good looking, but good for something - either producing edible fruit or leaves, or useful as a medicinal herb, or for tea. Most people are familiar with rosemary and thyme, but did you know that the flowers of nasturtiums, daylilies, borage, and all kinds of squashes are edible?

Well since we are planting an edible landscape we had to be brave and eat some flowers. (You already eat one flower even if you didn't realize it - yes broccoli!) Not my daylilies since they are too pretty, but we had plenty of squash blossoms out back. Squash vines have separate male and female flowers on the same plant. You can tell them apart by their stems. A male flower has a long stem, a female flower has a very short stem and has a round bulb at the base of the flower which is the immature fruit. Since there are many more male flowers on the vine then female, you can sacrifice a few of the male flowers for dinner without reducing the chance that your female flowers will be pollinated.

Squash flowers open for only one day, in the morning, and are usually closed by noon. Take a glass of water and a pair of scissors out into the garden in the late morning - after the bees have finished with your flowers, but before they have closed up. Look for the male flowers with the long stems and check inside for any bugs hanging out. Beetles and such like to hang out in the flowers, and since you dont want to take them inside or eat them, evict them now. Cut your flowers with the long stem intact and put them in your glass of water. Your flowers will keep for one day so use them up for dinner or breakfast.

When your are ready to use your flowers (which will probably close up within a few hours of cutting) the preparation is simple. Cut off the base of the flower where the stem is attached and the anther part (that holds the pollen) will fall out. This part doesn't taste good. You will only be eating the petals.

Squash flowers are used mostly in Italian and Mexican cooking. Most of the recipes I found for them involving stuffing the closed blossoms with an herb and cheese mixture, dipping them in flour or batter, then frying them. They are also used in both Mexican and Italian soups, and chopped up in Mexican quesadillas, or you could chop them and add them to a salad.

The way we ate ours was to add them to the pan we had cooked our ribs in and let the moisture of the blossoms (they are mostly water) deglaze the pan. We served them over the meat. Twelve blossoms reduced in size to a couple of tablespoons, so stuffing them and frying them might give you a little more to bite into.

I'll be giving you more info on edible landscaping as we try new things. We had a blast eating our flowers for dinner and trying something new.